How to replicate FabHydro
Welcome to the tutorial page. We aim to help you get familiar with FabHydro pipeline and make your own 3D printable hydraulic systems. By the end of the tutorial, you should be able to replicate what is in the gifs with your resin printer. Before we start, be aware:
You should be able to replicate what we did while this is a tutorial derived from the outcome of a research paper, if you find the idea interesting, you can refer to this for more details.
This project involves resin material. When handling resin and printed product:
⚠️Always wear gloves and mask to avoid direct skin or eye contact;
⚠️Keep away from children;
⚠️Wash with plenty of water immediately if you get direct skin contact with resin
In this tutorial, we are presenting 2 different processes: “Submerged Printing Process” and “Printing with Plugs”.
Submerged Printing Process: The entire printing process happens under the resin level, and any chamber topologies in the 3D model will be enclosed with resin in it. In this case, if we design the structure as such that the resin can flow in the chamber and cause local deformation, we can use the end device as a hydraulic actuation system.
Printing with Plugs: the aforementioned structure printed hollow, while injected with desired hydraulic fluid of your choice can be done with a “drain hole and plug” interface. So print, inject and plug. Then you are ready to go with your customized hydraulic actuation system.
The former requires a slight modification to the 3D printer (tutorial included), and the latter needs post-filling process to complete the hydraulic system. You can click on the corresponding link to jump to certain section.

Submerged Printing Process
What You Need
To best replicate what we created in Fabhydro, here are some resources regarding the material and printer we used in the paper.
Material
Fabhydro relies on flexible printable photo-resin. The F39T (transparent) / F39 (white) / F69 (black) series can be found on RESIONE website and Amazon. Aside from this specific resin we used there are other available resin series on the market. As a start point of trial and error, our resin has a shore value range of 60-75A.
Printer
A consumer grade SLA printer is needed in replicating FabHydro. Specifically, any SLA printer is capable of generate the similar result with calibration, while data provided in this instruction is based on ELEGOO MARS 2.
⚠️In this process, liquid resin will be locked inside the printed part. If the part rupture at any time under exceeding load, resin will leak.
⚠️In the process, please where personal protection equipment (goggles, gloves) and handle resin and resin prints carefully.


Custom Resin Vat and Build Plate
Custom Vat Build
A custom resin vat is needed for the submerged printing process to ensure the part is dipped inside the resin during the entire printing process. A 3D model of the custom vat that suits the ELEGOO MARS 2 build Plate can be found here for 3D printing. Be sure to measure your build plate and ensure the opening of the vat is at least 5-10 mm bigger than the build plate dimension in both length and width.
For those willing to save print time, the vertical extrusion higher than the vat clamping rim can be replaced with acrylic and sealed with acrylic silicone caulk
The 3D printed vat has a similar FEP mounting profile as the stock vat, the holes are left for thermal inserts. Once inserts are in place, the stock FEP can be transferred directly from your stock VAT with the original fixture. If needed, FEP changing process is the same as the stock vat.
Custom Build Plate
To prevent the build plate attachment from interfering with the extended resin vat, an extension of the stock build plate has to be added.
Take off the build plate by loosening the hex-drive bolt to reveal to ball joint;
Cut the ball off leaving similar length of rod on each side;
Attach a section of steel rod (approximately 3-5 cm according to the coupler selected) in between with 2 couplers;
Assemble the calibration ball back to the attachment and test fit on the printer. Note that we need a customized calibration piece for the homing light gate sensor, it takes trial and errors to get the length right. You can start with this 3D model if you are using ELEGOO MARS, and this if you are using ELEGOO MARS 2, and trim the bottom of the assembly to achieve smooth calibration process with your customized build plate.
Upon finishing both the vat and build plate, calibrate as normal, and you are ready to go.


File Preparation
3D Model Generation
As described in the paper, a complete FabHydro system consists of generator, transmitter and actuator. You can find the parametric 3D models of each here (all models are constructed with Autodesk Fusion 360):
Generator are bellows-shape structures, if you are printing them vertically, you need to add panel support, an example is shown in this model. Generator can also be custom shaped, an example can be found here;
Transmitter are swept ring across a 3D curve;
Actuators behaves differently according to the structure including bending, straightening, extending and curling;
An example assembly of a 1-generator-1-actuator system is shown in the figure, and its model can be found here;


Support and Slicing
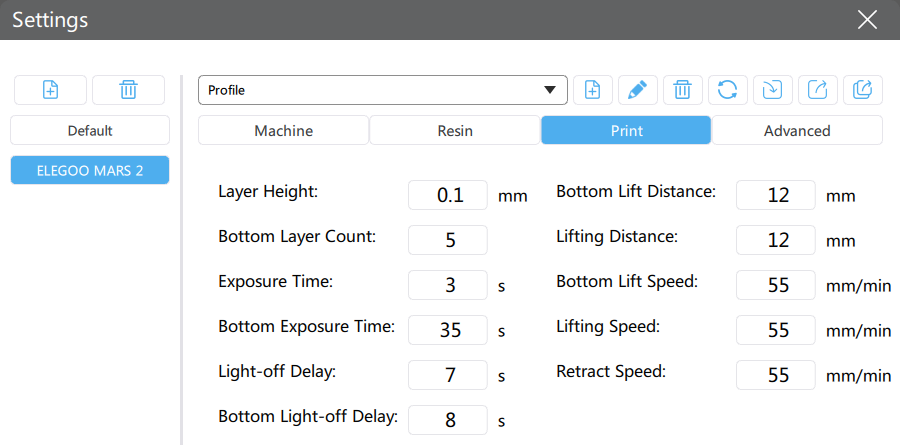
Since FabHydro is printing with flexible material, customized support parameters are adopted. We are using chitubox to slice the 3D models into printable files. After exporting your assembly and accessory parts into STL files, import them in chitubox, apply our settings then you are ready to print. The slicing settings contains printer profile and support structures.
Machine settings are provided for ELEGOO MARS 2, in general, start from slow lifting and retracting speed, longer lifting distance and longer exposure time.
Support structures are majorly auto-generated, the setting can be found in the figure labelled “support setting”. Large overhang edges need some manual attention, make sure the edges are allocated about 1 support pillar per 4-6 mm or denser.
Machine Setting

Support Setting 01

Support Setting 02

Support Setting 04

Support Setting 03
Printing & Post Processing
After slicing, acquire the file from the slicer software, copy it into a flash drive.
Fill in the resin to a level where it won’t spill when the build plate is entirely submerged, but high enough to be taller than anticipated part height.
Plug in the drive and start printing.
After printing, chisel the part off the build plate carefully. Cut off the support structures.
Congrats! 🎇 Now you have your Hydraulic system!

Printing with Plugs
What You Need
To best replicate what we created in Fabhydro, here are some resources regarding the material and printer we used in the paper.
Material
Fabhydro relies on flexible printable photo-resin. The F39T (transparent) / F39 (white) / F69 (black) series can be found on RESIONE website and Amazon. Aside from this specific resin we used there are other available resin series on the market. As a start point of trial and error, our resin has a shore value range of 60-75A.
Printer
A consumer grade SLA printer is needed in replicating Fabhydro. Specifically, any SLA printer is capable of generate the similar result with calibration, while data provided in this instruction is based on ELEGOO MARS 2.
File Preparation
3D Model Generation
As described in the paper, a complete FabHydro system consists of generator, transmitter and actuator. You can find the parametric 3D models of each here (all models are constructed with Autodesk Fusion 360):
Generator are bellows-shape structures, if you are printing them vertically, you need to add panel support, an example is shown in this model. Generator can also be custom shaped, an example can be found here;
Transmitter are swept ring across a 3D curve;
Actuators behaves differently according to the structure including bending, straightening, extending and curling;
An example assembly of a 1-generator-1-actuator system is shown in the figure, and its model can be found here;
For makers who are willing to fill the system after print can allocate plugs with the female part (nut) joint with the assembly and the male part (bolt) printed separately;
Switches can be added in between tubes.
Support and Slicing
Since FabHydro is printing with flexible material, customized support parameters are adopted. We are using chitubox to slice the 3D models into printable files. After exporting your assembly and accessory parts into STL files, import them in chitubox, apply our settings then you are ready to print. The slicing settings contains printer profile and support structures.
Machine settings are provided for ELEGOO MARS 2, in general, start from slow lifting and retracting speed, longer lifting distance and longer exposure time.
Support structures are majorly auto-generated, the setting can be found in the figure labelled “support setting”. Large overhang edges need some manual attention, make sure the edges are allocated about 1 support pillar per 4-6 mm or denser.
Machine Setting
Support Setting 01
Support Setting 02
Support Setting 04
Support Setting 03
Printing & Post Processing
After slicing, acquire the file from the slicer software, copy it into a flash drive.
Fill in the resin to a level where it won’t spill when the build plate is entirely submerged, but high enough to be taller than anticipated part height.
Plug in the drive and start printing.
After printing, chisel the part off the build plate carefully. Cut off the support structures.
Prepare your desired hydraulic fluid. We have tried water and resin. Feel free to explore by yourself, in general the more viscous the fluid is, the more force it will withstand. For more details, you can refer to our paper here.
Either submerged the entire assembly in the fluid, or fill in the liquid with a syringe. Make sure there is as little air as possible left in the system, and “bolt on” your plug.
Congrats! 🎇 Now you have your Hydraulic system!


